Assignment 5
Introduction
In this assignment, you will run Spark jobs on Amazon Web Service's (AWS) Elastic MapReduce (EMR) service, a cluster computing facility in AWS cloud. It was named for MapReduce as it was the original 'feature' but the service has continually expanded to cover emerging workload/apps/frameworks. Spark was added in EMR 4 and has since tracked the evolution of Spark; you can transfer the lessons you learned on the local cluster directly over to AWS.
Some advantages of an EMR cluster over a local cluster:
- It can read directly from S3 object storage, a widely-used AWS service.
- Many organizations already store their data on AWS, so running the analytics there as well makes sense.
- It is optimized for a cloud environment.
- It integrates with other AWS services (metrics, machine learning, queuing, ...)
- It scales on demand—pay for what you need, when you use it.
- It features specialized hardware that can accelerate tasks such as machine learning.
Some disadvantages:
- It has a complex console for interactive use.
- You have to turn clusters off when not in use if you do not want to pay for idle capacity.
Although we will focus on Amazon's service, similar tools exist on other major cloud vendors:
In addition, Databricks, the company founded by the creator of Spark, offers a managed Spark service that runs on all the above vendors.
One important point that we will return to several times in this assignment: When an EMR cluster (or indeed any cloud computing resource) is running, you are charged for every minute, whether or not it is performing any productive work for you in your application. When you are done working with a cluster, either to take a break during the assignment or when you are completely done, terminate the cluster to stop the charges. We will describe how to do that in a later section.
Prerequisite 1: Code that you will need from Assignment 4
Before starting this assignment, you will need the following programs from Assignment 4:
relative_score_bcast.pyweather_etl.py
Both should be correct, of course. If you have doubts, test them on the local cluster before running them on EMR.
Prerequisite 2: Tunnelling Spark History for the local cluster
In Step 3 of the Assignment, you will look up the Spark History for an application run on the local cluster. In order to do this you will need to configure tunnelling for this feature.
If you have not already done so, add the following line to
your entry in ~/.ssh/config for the local cluster:
LocalForward 18080 controller.local:18080
Preparing your S3 bucket
Most EMR applications take their input from Amazon S3, the object storage service for AWS. S3 can inexpensively store very large datasets and is often used for data lakes on AWS. Analytics tools such as Amazon Redshift, Amazon EMR Spark, and Snowflake can all take input from S3. We will use EMR Spark in this assignment.
The top-level unit of S3 is a bucket, which is located in an AWS Region. Unlike many other AWS services, an S3 bucket is not further localized by Availability Zone within a Region.
There is one further complication: S3 bucket names are globally
unique. And when Amazon says "global", they mean it. If you
successfully create a bucket named
my-oh-so-marvellous-bucket-yes-yes, no one else can use that bucket
name. Not any other user. Not in any region. So long as you have that
bucket name, no one else can use it anywhere in the world. (There
are some specialized AWS "partitions", such as the one for the US
Government, that have their own namespace but virtually all
applications run in the general partition that we will use.)
For this assignment, we will write BUCKET anywhere you need to place your bucket name. For example, if we ask you to submit the parameters,
--conf spark.yarn.maxAppAttempts=1 s3://BUCKET/relative_score_bcast.py s3://BUCKET/reddit-1 s3://BUCKET/output/reddit-1-1
and your bucket name is my-bouquet, you would write
--conf spark.yarn.maxAppAttempts=1 s3://my-bouquet/relative_score_bcast.py s3://my-bouquet/reddit-1 s3://my-bouquet/output/reddit-1-1
The best practice for naming your AWS resources is to adopt a naming convention to document the purpose, type and scope of each resource. AWS (and cloud services) also has a tag feature that offers a programmatic approach but we will not be using it here. See here for a starting point on naming conventions.
For this course, start with the bucket name of c732-SFU-ID-a5.
Create an S3 bucket for your course work
To create your bucket, do the following steps:
- Sign on to your IAM id for AWS.
- Go to the S3 Console:
- Switch to the Oregon/us-west-2 region (top-right).
- Drop down the menu labelled
Services(in the top left corner of the AWS landing page). - Locate the
Storagecategory in the menu and click onS3within that category.
- Click
Create bucket(middle right), producing a dialog box. - In the dialog box, enter:
- Bucket name (Text):
BUCKET(Start with the namec732-SFU-ID-a5and add qualifiers as required to uniqueify your name.) - Accept defaults for all other items
- Scroll to the bottom of the page and click
Create bucket.
- Bucket name (Text):
- A status bar will appear top-of-page. If it is green with
Successfully created ..., close the dialog by clicking theX.
Your EMR Spark jobs will get their source code and input data from your new bucket, as well as send output there.
Upload your code to the S3 bucket
The first step is to upload your two Spark programs from Assignment 4 to your new S3 bucket.
- Go to the S3 top-level Console.
- You should see
BUCKETin the list of Buckets. - Click
BUCKET. - Click
Upload(upper left) to go to theUploaddialog. - Click
Add files. - Using your operating system's selection tool, locate and select
relative_score_bcast.pyon your computer. - Use the same process to select
weather_etl.pyfor upload. - The S3
Uploaddialog should now list the two Python programs in itsFiles and folderssection ands3://BUCKETin itsDestinationsection. - Click
Upload. - A status bar will appear top-of-page. If it is green with
Upload succeeded, clickClose.
Upload the reddit-1 dataset to the S3 bucket
You will also need to get a copy of the reddit-1 dataset on your own
machine:
- From the list of files at
ggbaker.ca/732-datasets/,
select
reddit-1.zipand download it. - Unzip the file, creating a directory named
reddit-1.
Now upload that directory to S3:
- From the
BUCKETbucket, clickUpload. - Click
Add folder. - Using your operating system's selection tool, select the
reddit-1directory. - Confirm that you want to upload 10 files.
- The S3
Uploaddialog should now list all 10 partitions ofreddit-1in itsFiles and folderssection ands3://BUCKETin itsDestinationsection. - Click
Upload. - A blue status bar will appear, turning green on success. Click
Close.
Create an output folder in the bucket
The last preparatory step is to create a folder for output from your Spark runs:
- From the
BUCKETbucket, clickCreate folder. - Enter the name
output. - Click
Create folder. - Once again you should see a green status bar. Close it.
Verify the bucket contents
Verify that your BUCKET bucket contains the following:
relative_score_bcast.pyweather_etl.py- A
reddit-1folder with 10 partitions inside it. - An
outputfolder.
Starting an EMR cluster
Now that you have your code and input data ready, you can run your first Spark job on EMR.
As mentioned in the introduction, the consoles for AWS services tend to be complex and busy. Most of the information they display is irrelevant to your purposes. The key here is to focus on the few items that matter to you and ignoring the rest. This is a useful professional skill for working with AWS specifically and cloud systems more generally.
To start your first cluster:
- Sign on to your IAM id for AWS.
- Select the "us-west-2" or "Oregon" region on the top-right of the console.
- Go to the EMR Console:
- Enter
emrin the search bar at the top of the page - Click on the item labelled
EMR.
- Enter
- In the sidebar menu, section
EMR on EC2, click onClusters. - Click
Create cluster.
For this step of the assignment, we're going to create a small, simple
cluster, using the Quick Options dialog.
-
General configurationsection:- Cluster name (Text):
c732-emr-2x-m7.2xl(Most other AWS resources including EMR clusters are only scoped within your account and need not be globally unique.) - Release (Dropdown): choose the most recent EMR release.
- Select the
Spark Interactivebundle.
- Cluster name (Text):
-
Cluster configurationsection:- Select
m7a.2xlarge(for both Primary and Core) - Delete the
Taskinstance group.
- Select
-
Cluster scaling and provisioningsection:- Instance(s) of core nodes:
2
- Instance(s) of core nodes:
-
Networkingsection:- Select a VPC and Subnet, or create with the default options.
-
Security configuration and EC2 key pairsection:- Amazon EC2 key pair for SSH: you do not need to specify a key pair. (If you have created a key pair in your AWS account previously, you do not need to use one at this time.)
-
Identity and Access Management (IAM) rolessection:- Service role: either create a new service role with default settings or if you have it, select
EMR_DefaultRole. - Instance profile: select
EMR_EC2_DefaultRole.
- Service role: either create a new service role with default settings or if you have it, select
-
Click
Create cluster.
It can take 5–15 minutes to create a cluster, depending upon the
current AWS load. Near the top of the status screen, you will see a
green Starting status. Wait until the status changes to Running.
Terminating the cluster if you want to take a break
This assignment can take considerable time to complete. If you want to break and resume later, you will want to terminate the cluster so that you do not accumulate charges while you are away.
To terminate the cluster and stop charges, click Terminate at the
top of the cluster window.
Starting a clone of a terminated cluster
When you want to restart work, instead of creating a new cluster from scratch, you can start a clone:
- Open the list of clusters by clicking on
Clustersin the sidebar, under theEMR on EC2header. - In the list of clusters, click the box to the left of the one you would like to clone.
- Press
Clone. - When asked, "Would you like to include steps?", check
Noand pressClone. - After a pause, you will see a page summarizing the cluster.
- The cluster is specified by a sequence of four pages, of which you
are currently seeing the last. If you want to modify a parameter of
the cluster, you can press
PreviousandNextto locate the page on which to modify it. Then pressNextto return to the fourth page. - Once you are satisfied with the cluster specification, press
Create cluster.
The new cluster will take several minutes to start. When its
status becomes Waiting you can resume the assignment where you left
off.
Section 1: Submitting a first Spark application
Once the status line reads Waiting in green, you can submit Spark
applications. On EMR, each application is called a "Step". For
interactive use, you start up a cluster, submit steps one at a time,
then terminate the cluster when you are done. In batch use, you would
instead predefine the list of steps and they would begin to run
as soon as the cluster was ready, after which it would terminate.
-
Select the
Stepstab. -
Click
Add step. -
In the
Add stepdialog:- Step type
Spark Application - Name (Text):
Relative average Reddit-1 - Deploy mode (Dropdown):
Client - Spark-submit options (Text):
--conf spark.yarn.maxAppAttempts=1 - Application location (Text):
s3://BUCKET/relative_score_bcast.py - Arguments (Text):
s3://BUCKET/reddit-1 s3://BUCKET/output/reddit-1-1correctly formatted when submitted to Spark. - Action on failure (Dropdown):
Continue[Default]
- Step type
-
Click
Add step(Lower right)
Wait for change of Status
EMR steps proceed through three Status values: From Pending to Running
and concluding in either Completed (in gray) orFailed (in red):


Your step
will start with a Pending Status. This display does not automatically refresh,
so you will have to press the the "Refresh" icon (clockwise circle) at
top of step list, and wait for Status to change to Running and
eventually either of the final status values.
Diagnosing a Failed Status
If your step failed, it was most likely due to one of two reasons. You can diagnose these case with a few operations on the console.
-
The output folder already exists. An annoying feature of Spark is that its jobs can fail in a write stage if you specify an output directory that already exists. Click the leftmost triangle on the step to open up the details:
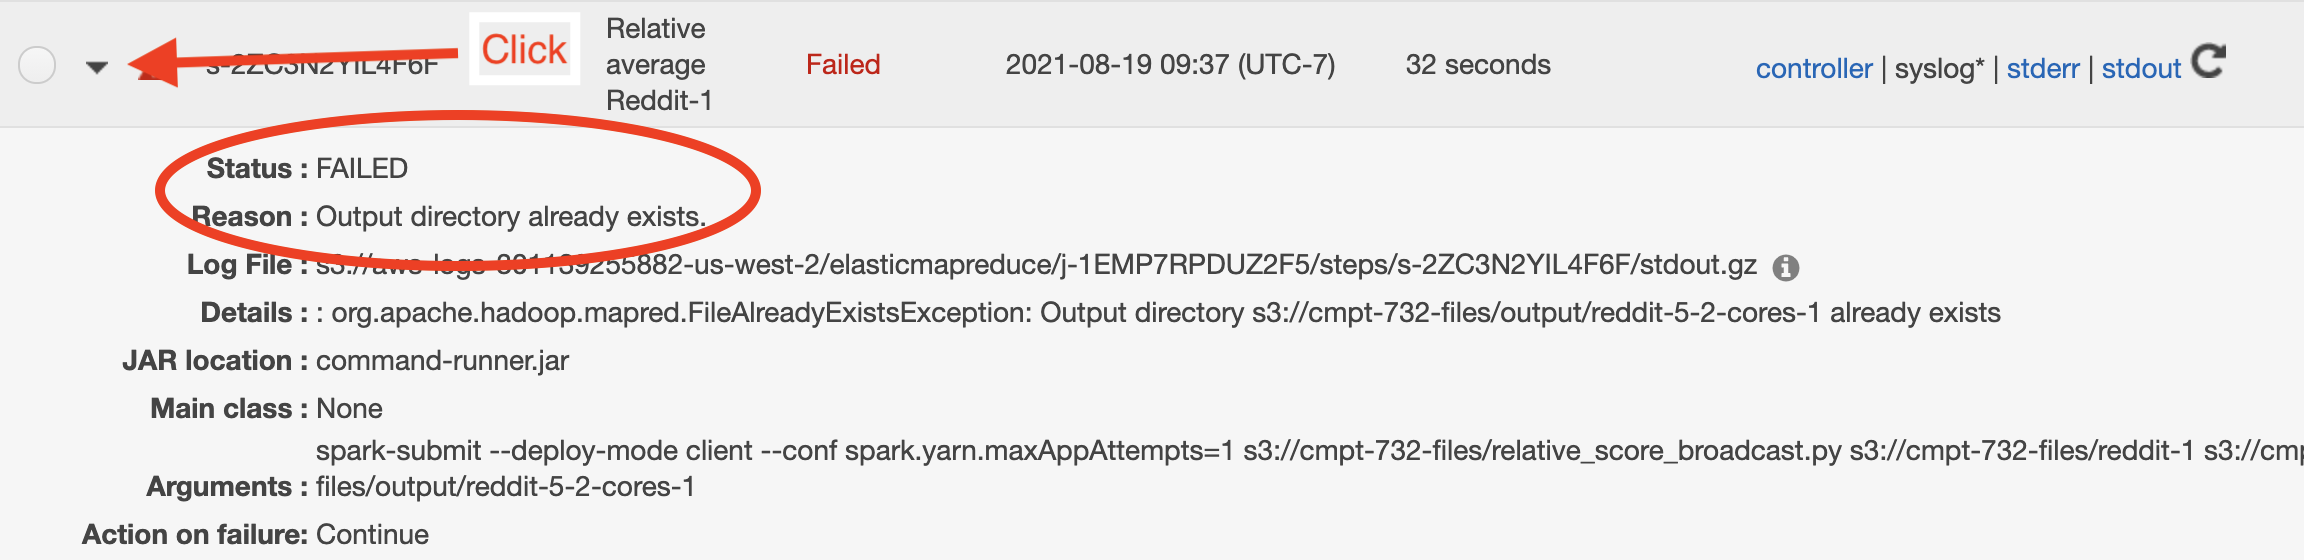
In this case, the
Reasonsection will state that the output directory already exists. -
There is an error in the Python code. If you have a Python error, the Step details will have a reason section reading
Unknown errorand you will have to look at thestdoutlog for details. It can take several minutes for that log to become available from the EMR Console. Initially, you will see something like this (note the "No logs created yet" in the upper right):
(The "No logs created yet" message is misleading. The logs have been created on the cluster but not yet transferred to the management console.) Occasionally press the "refresh" icon (the clockwise arrow) until the logs become available:

Click
stdoutto see the output, which should indicate the type of error and its line number.
Viewing the results of a success
If the step ended with a "Completed" status, it will have produced
output partitions in the S3 directory you specified,
output/reddit-1-1. In the S3 console, navigate to that
directory. Download the part-00000 partition and verify that it
contains the values you expect from Assignment 4.
We won't be using the output files any more, so you can delete them in the
S3 console when you're done reviewing them. But leave the output
directory, which we'll continue to need.
Section 2: Pushing the filter closer to the data
In this section, we will see how pushing some of the computation closer to the data can dramatically reduce the amount of data that we have to process. S3 is a more sophisticated data store than HDFS used on the local cluster and can do important parts of the computation for us before the data is sent to Spark.
A fascinating feature of EMR's adaptation of Spark is that if the query planner is informed that input is coming from S3, the planner will automatically push as much filtering as possible to the file reading.
Loading the input data to S3
This section will read a different dataset, weather-1 and its companion weather-1-but-different. As you did in
the first section, download the dataset to your machine from
ggbaker.ca/732-datasets/ and
upload it to S3 in your bucket.
Running with the original data
Add a new step with to your cluster with the following parameters:
- Step type (Dropdown):
Spark Application - Name (Text):
Weather, no S3 filtering - Deploy mode (Dropdown):
Client - Spark-submit options (Text):
--conf spark.yarn.maxAppAttempts=1 - Application location (Text):
s3://BUCKET/weather_etl.py - Arguments (Text):
s3://BUCKET/weather-1 s3://BUCKET/output/weather-1 - Action on failure (Dropdown):
Continue[Default]
The step should run quickly.
Viewing the read size in the Spark history
EMR saves a step's Spark history for a week after it has completed. You can review that history during that week, even after the cluster has been terminated. There is a tremendous amount of detail in a Spark history, which you can use to optimize your applications. We'll dip into those details a few times in this assignment. In this section, we'll just look at the size of the input data.
- Select the
Summarytab in the cluster page. - Under
Cluster managementclickSpark History Server. It may take a minute or two for the history to load into a new browser tab. - Look for the application named
weather ETL(or whatever you named the application in your call toSparkSession.builder.appName()). Click on the link in theApp IDcolumn. Note: In some cases, you may have to go to theShow incomplete applicationpage to see your application, even though your application has in fact completed. - Click on the
Stagesitem in the top menu bar. - One of the completed stages should have a value for
Inputindicating the amount of data transferred from S3. Make a note of that value. [❓]
Same code, different data
Repeat the above, but using the weather-1-but-different data set as input.
The contained data is identical but arranged differently. If you examine the output, you should see the same content (perhaps in a different order and partitioning, but conceptually identical).
Have a look at the Spark history for this step. Again, note the Input size for the step that read the data from S3. [❓]
Terminate this cluster
Terminate this cluster. In the next section, we will use a different configuration.
Section 3: Exploiting the elasticity of cloud services
In a cloud service, you pay for what you use when you use it. You can take advantage of this to expand your capacity temporarily when you need more. This property is called elasticity.
In this final section, you will use EMR to temporarily obtain some extra capacity to complete a job more quickly than you could achieve it on the standard cluster used in the course.
For comparison, we're going to run the same job on the local cluster first. Sign on to the local cluster and run the following job:
spark-submit --conf spark.dynamicAllocation.enabled=false --num-executors=4 --executor-cores=1 relative_score_bcast.py /courses/732/reddit-5 reddit-5-1
Bring up the Spark History at
localhost:18080 (you will need to have an
active SSH connection and have met Prerequisite 2 above). Locate
your application on the list and click on its App ID link. From the
Spark Jobs page, note the Total Uptime (top left) and record the durations of
each job listed in the table. [❓]
Running an on-demand cluster from EMR
Imagine that the run you just made on the local cluster was the largest available to you. For example, the cluster might be shared by multiple teams, with your team allocated no more than this. What can you do if you need results faster than you can get them from your allocated local resources? You scale up by running an on-demand cluster from a cloud vendor such as AWS.
To do this, start a clone of the last cluster (as usual, not copying
any steps from it) but this time change the
hardware specification (on page "Step 2: Hardware" of the cloning
sequence) of Node type Core:
- Amend the name of the clone to
c732-emr-4x-m7g.xl(changed this from an earlier version using m7, which is not currently available in this region) - Set Instance type of the "Core" Core Instance Group to
m7gd.xlarge(Note thed) - Set Instance count to
4
We are requesting 4 instances, each with 4 cores, rather than the 4 instances with 1 core that we were allocated on the local cluster.
Once you have made this change, advance to the fourth page ("Step 4")
and press Create cluster. These more powerful
instances seem to also start up faster than the weaker m7a.2xlarge
instances we used on our earlier EMR clusters.
Optional: start the job and terminate the cluster automatically. Under "Cluster termination and node replacement" you can ask that the cluster "automatically terminate cluster after last step ends", and add the step as described so it starts when the cluster is ready.
When the cluster is ready, submit a Spark job running
relative_score_bcast.py reading input from
s3://sfu-cmpt-732-redshift/reddit-5/ (this is a publicly-accessible S3
bucket). Remember to specify a brand-new output directory so that your
application does not fail on its write.
When the job has completed, open up its Spark history and select the
Jobs page. Record the Total Uptime, as well as the time of each job when
running on this cluster. [❓]
Once you have run the job, terminate the cluster. These more powerful instances are more expensive and you do not want to run them for longer than necessary.
Questions
In answers.txt, briefly answer these questions:
-
Take a screen shot of your list of EMR clusters (if more than one page, only the page with the most recent), showing that all have
Terminatedstatus. -
For Section 2:
-
What fraction of the total data size (
weather-1) was read into Spark when you used the "but different" data set to calculate the same result? -
What is different in the "but different" data that allows less data to be transferred out of S3 (and thus less S3 charges)? [hint]
-
-
For Section 3: Look up the hourly costs of the
m7gd.xlargeinstance on the EC2 On-Demand Pricing page. Estimate the cost of processing a dataset ten times as large asreddit-5using just those 4 instances.
Submission
Submit your files to the CourSys activity Assignment 5.