Assignment 0
Do you already have an AWS id?
Even though you already have an AWS userid you may not have set up all the features we need for this course:
- AWS root user
- IAM administrative user
- At least one EC2 key pair
- Budget alert
If you have not already set up any of these, skip to the appropriate section below.
Sign up for AWS
If you do not already have an AWS account, go to
aws.amazon.com and click Create an AWS Account. You will need a credit card number to complete the
process. Note that AWS accepts prepaid credit cards, if you do not
have a Canadian credit card.
Note that AWS' free students credits are not useable because of region and service limitations. In prior terms, students typically incurred $20 or less of charges for the three assignments.
See How do I create and activate a new AWS account? for detailed instructions. For support plans, select the free "Basic Support" plan.
We strongly recommend setting Multi Factor Authentication (MFA) on your AWS root user account.
Set up an IAM user with full administrative privileges
The AWS account you set up in the previous step is the root user. This user has total control over your account. Use the root user sparingly. Really, you only need to use it once, to set up an "IAM administrative user". This id will have the same high privileges as your root user but if this id is compromised you can sign in to your root user and disable it. Of course, for the administrative user to actually provide a second level of security, the IAM administrative user must have a different password from your root user.
In the IAM service, create a new user:
- Under "Access Management", select "Users" and "Create user".
- Create a user with AWS management console, create a new IAM user.
- For permissions, "attach policies directly" and give the "AdministratorAccess" permission.
As with the root user, we strongly recommend setting Multi Factor Authentication (MFA) on your IAM administrative account.
Create an EC2 key pair
You will also need an EC2 key pair for SSHing into the master node of your EMR Spark cluster.
Perform this step on a private computer, not a publicly-shared machine. You will be downloading a private key that will serve as your identification to AWS machine instances.
-
Sign on using your IAM administrative user.
-
Type
key pairinto the service search bar at the top of the page. -
Click on
Key pairs(around the middle of the search results, underFeatures). -
If you have at least one key pair in the list, you do not need to do anything more.
-
If the list is empty, click
Create key pair(top right) -
In the "Create key pair" dialog:
- Name (Text): Enter a name (You might include "AWS" in the name to remind you of the key's purpose)
- Key pair type (Radio button): RSA [Default]
- Private key file format (Radio button): [Pick the type appropriate for the SSH tool you use; most times that's OpenSSH]
- Tags: [None needed]
Click
Create key pair.
The private key will be downloaded to your machine.
On your machine, do the following:
-
Create a directory for storing AWS keys. Set the access modes so that only you have access. In Linux/macOS, the command is
chmod go-rwx <DIRNAME> -
Move the key file from the download directory to the directory you just created.
-
Set the access modes on the key file so that only you have access.
-
Set the access modes on the key file so that even you cannot modify it. In Linux/macOS, the command is
chmod u-w <KEYFILENAME>
You're almost done! There's one more step, which will help you avoid getting nasty surprises on your credit card bill.
Set a budget alert
In this final step, you will set up an alert so that AWS emails you whenever your monthly bill has gone above a specified limit. We suggest a limit of $20 US but you can set any value you find comfortable. These alerts are useful if you forget to turn a service off and leave it running—AWS will alert you that you're racking up unexpected charges.
-
Sign on using your root user.
-
Type
budgetin the service search bar at the top of the page. -
Click
AWS Budgets. -
Click
Create a budget. -
Select
Monthly cost budgetradio button [Default]. ClickNext. -
In the "Set budget amount" step:
- Period (Dropdown):
Monthly[Default] - Effective date (Radio button):
Recurring Budget[Default] - Start month (Date): Current month [Default]
- Choose how to budget (Radio button):
Fixed[Default] - Enter your budgeted amount (Text): Threshold for the alert: $20 US is a good start
- Budget name (Text): Name
Click
Next. - Period (Dropdown):
-
In the "Configure alerts" step:
- Click
Add an alert threshold - Threshold (Numeric): 100%
- Trigger (Dropdown):
Actual[Default] - Email recipients (Text): Enter your email
Click
Next. - Click
-
In the "Attach actions" step:
- Do not add any actions---click
Next.
- Do not add any actions---click
-
In the "Review" step"
- Review your settings and if correct, click
Create budget.
- Review your settings and if correct, click
If you'd like you can set multiple levels of budget alerts. We ask that you set at least one.
Submission
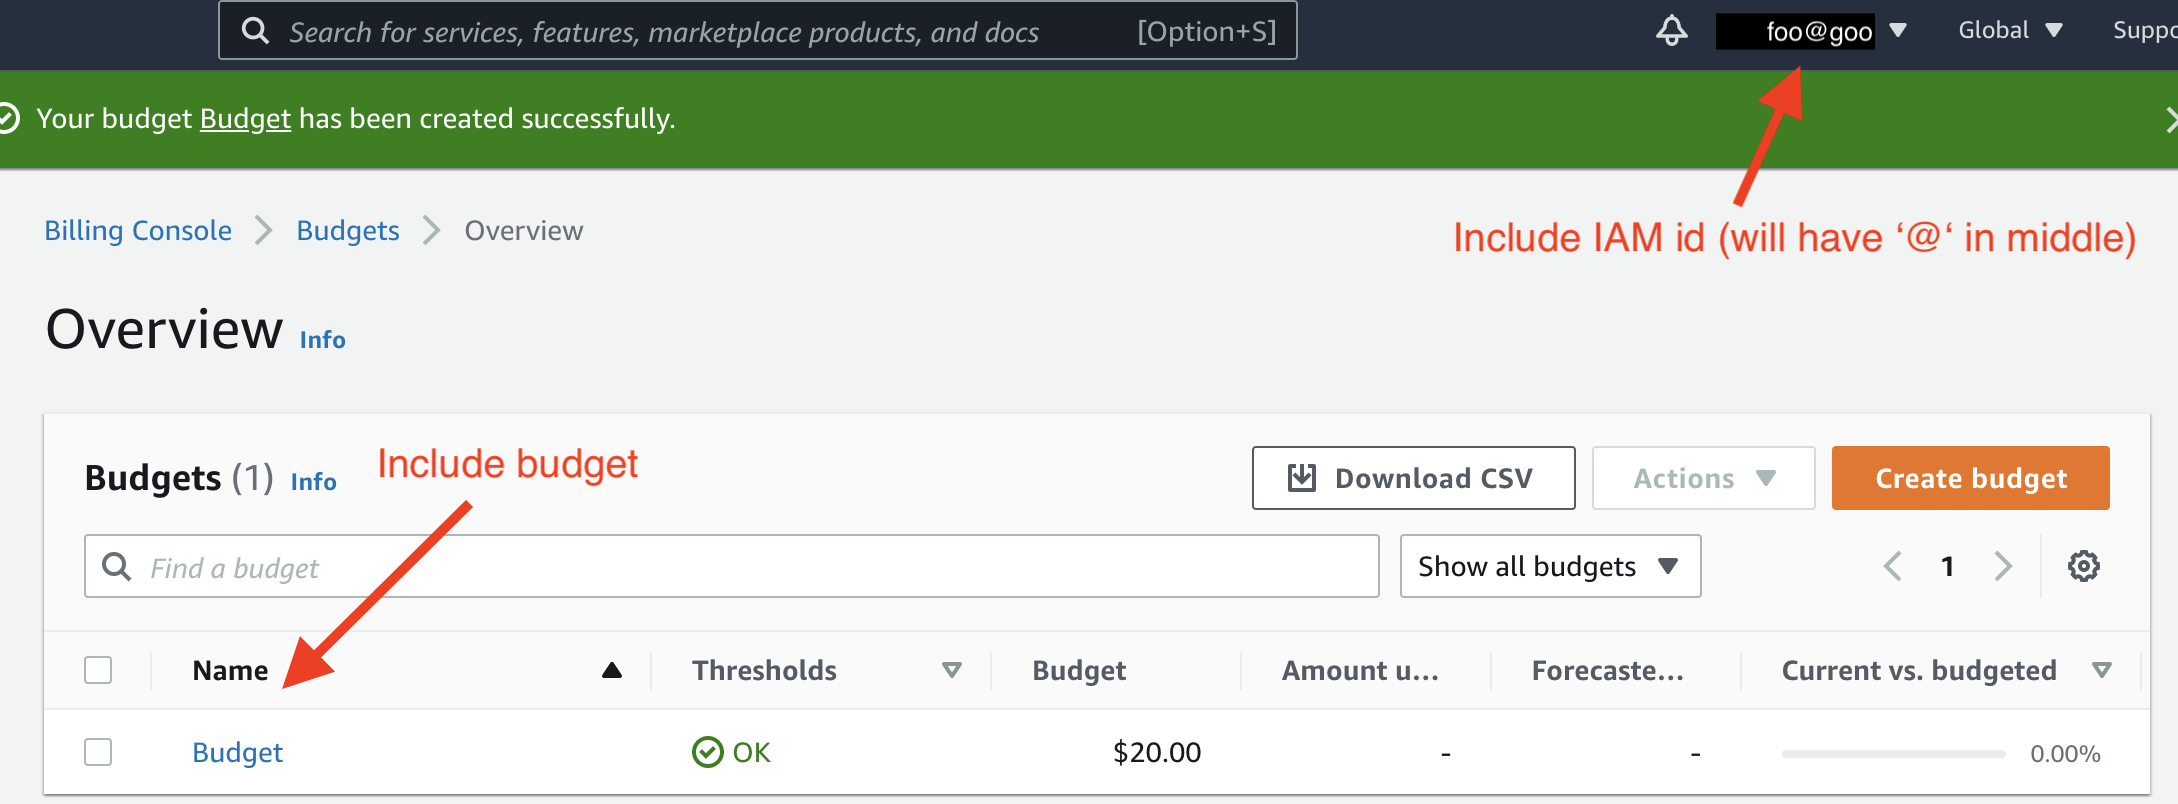
Take a screen shot of your Budgets Overview. Your screen shot should include both the budget and either the root user or IAM userid in the top right corner, as highlighted in the following screen shot. You do not need to add the highlights to your screen shot.
Submit your screen shot to Assignment 0